Home of Inspirational Talks, Codding, Downloads, Write Ups and How Tos

Showing posts with label Phone Tips. Show all posts

How to Text from Your Computer (Complete Guide) (Video)


There’s nothing like a full-blown keyboard for typing. Even though touchscreens have gotten better, more responsive, typing with two thumbs will always be beaten by typing with all ten fingers.
Interestingly enough, some app developers agree (so does Apple) and there are ways to use your real keyboard and text from your computer instead of the phone. This ability is one I actually love when I’m working –receiving and sending texts from my computer while my phone is comfortably plugged it on the desk.
I figured I wasn’t alone in this enjoyment so if you also want to be able to text from a computer, here’s how to set it up regardless of whether you have iOS or Android.

iOS and Mac

If you happen to have an iPhone and also own a Mac then this is pretty easy to do. Both devices have iMessage built in so with just making sure a few settings are turned on you can easily send messages from your computer and have your iPhone deliver them.
Messages on Mac

Setup the iPhone & Mac

  1. On the Mac, open Messages and login with your iCloud account.
  2. On the phone, go to Settings > Messages.
  3. Make sure iMessage is On.
  4. Tap on Text Message Forwarding (this allows the computer to send texts and not just iMessages).
  5. Turn it on for your Mac.
  6. Put the code you see on your Mac into the field prompting for it on your iPhone and tap Allow.
At this point, you can open Messages on the computer and you are good to go.

iOS and Windows

If you have an iPhone but use Windows for your computer, you’re in for a bit of a headache. Simply put, there is no easy solution to get text messages setup on Windows, but, if you are willing to jailbreak your iPhone, there is a way…

Setup the iPhone

  1. First you need to jailbreak the iPhone. Follow the steps here for your version of iOS and come back here once you have successfully installed Cydia.
  2. Open Cydia and tap the Search icon at the bottom.
  3. Search for Remote Messages and install it (it costs $4.99).
  4. Once installed the phone will need to reboot.
  5. Once it reboots, head to Settings > Remote Messages.
  6. Set a username and password to login with.
  7. Slide Enable to On.
  8. Connect your phone to Wifi.

Setup the Windows PC

  1. Make sure your PC is connected to the same Wifi network as your phone.
  2. Open a web browser and type in the IP address that is displayed in the Remote Messages settings on the phone.
  3. Put in your username and password when prompted.
After that you can send and receive texts from the browser on your PC.

Android

mySMS
Even though Google made Hangouts able to send and receive SMS on your Android phone, you still cannot use Hangouts on a desktop to send text messages so you have to rely on a third party app.
Regardless of whether you have Windows or Mac, you’ll need to download and setup the same app/Chrome extension on both (most work through the browser so they’ll work regardless of the OS of the computer anyway).
My two favorite SMS clients for Android are Pushbullet and MightyText, each is very similar but Pushbullet is a little cleaner looking in my opinion. The big difference in them is the amount of free texts they allow –100/month for Pushbullet and 500/month in MightyText. After you reach that limit you’ll have to pay the same $4.99/month (or $39.96/year) to send more than that.
If you want a totally free option though, you can use MySMS.

Setup the Android Phone

  1. Open the Play Store, search for and install either Pushbullet, MightyText, or MySMS.
  2. Open either once they are installed and login with your Google account and go through the setup process.

Setup the Desktop

  1. Open your web browser (I’m using Chrome, but you can use Firefox as well for most of them).
  2. Head to mightytext.net/app, pushbullet.com, or app.mysms.com depending on which you installed and login with the same account you logged in with when installing them on your phone.
  3. Optionally, you can also install the Chrome extension (or Firefox extension if the app has one) to get notifications when you someone texts you.
  4. Start typing away in the browser and it’ll send the texts from your Android phone.
There you go, the easiest way to send sms from a computer. Try it out and let me know in the comments below what you think of it or if you have another app you prefer to use.
Share:

How to Turn off Live Notifications on Facebook


OK, so the live craze is great and all. I love the idea of using live video on social to show something that might be important to show in the moment: news, an event, an announcement, hell, even a live show you might do. Sure! What I don’t want to see live, is a drunk person showing me the inside of a poorly lit bar while screaming out the wrong lyrics to whatever song happens to be playing.
As with any new tech/social feature, there’s an etiquette that isn’t exactly inherent at launch, but instead, needs to be learned slowly as more and more people try it out–and subsequently get yelled at for being annoying.
I feel like by now, most people are toning down the live videos and being a little more particular about their use of it (thankfully).
But… there’s always that person.
For those us who happen to be friends with that person on at least one social network, I figured I’d show you real quick how to disable the live notifications from them on each of the most popular social networks (or turn live notifications off entirely, in some cases).
Let’s start with the most egregious of live social networks: Facebook.

How to Turn off Live Notifications on Facebook

When Facebook first launched live notifications, I swear… Every hour I had people “going live”. Again, it’s toned down thankfully, but if you want to make sure to not have to deal with it from a specific person, it’s easy to do, but only if they go live again. Let me show you.

Turn Off Live Notifications for an Individual

There’s no way to turn off live notifications for individuals without them first notifying you that they went live. But when they do:
  1. Tap and hold on the notification that said “X is live now”.Zuck Goes Live
  2. It’ll then show you an option to Hide this Notification or Turn Off Notifications About Live Videos from X. Tap the latter.Turn Off Live Notifications on Facebook
That’s it for disabling it for an individual. Now, if you just don’t want live notifications entirely, there’s a setting for that, too.

Turn Off Live Notifications. Period.

  1. Open the Facebook app on your phone.Facebook
  2. Tap on the settings icon (yes it moves every couple of months cause Facebook can’t help themselves, but it looks generally like the below).Facebook Settings
  3. Scroll down to and tap on Notifications.Facebook Notification Settings
  4. Tap Live Video.Facebook Live Video Settings
  5. Turn off Allow Notifications on Facebook to turn them off on all devices or tap the Push option to just stop it from notifying you through notifications on the phone (you might still be signed up to get them through email, SMS, etc so the second option won’t stop that).
  6. Boom. Done.
Next up, I think would be (of course owned by Facebook) Instagram. Here’s how to turn the Instagram Live notifications off, as well.

How to Turn Off Instagram Live Notifications

Unlike Facebook, there’s no way to block live notifications from individuals on Instagram–it’s an all of nothing situation. But, if you want to disable all live notifications on Instagram, here’s how:
  1. Open Instagram.Instagram
  2. Head to the settings (gear or three dots at the top right of your profile page) and tap on Push Notifications.Instagram Settings
  3. Scroll to the very bottom and turn off Live Notifications.Instagram Live Video Notifications
And, again, done.
There you go, guys. hope that helps some people out, let me know if I missed something and need to add it or just say hi if this helped you in some way. Don’t forget to chat with me on social and subscribe to my weekly newsletter for all the tips, tricks, news and videos I do delivered every Sunday.
Regardless, thanks for reading!
Share:

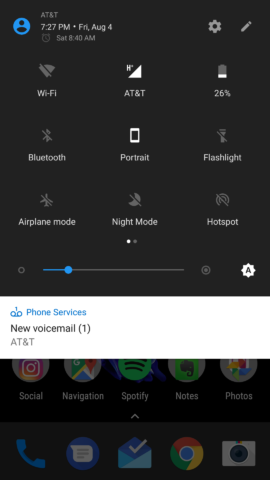
How to Get Rid of that Annoying Voicemail Icon When You Have No Voicemail (Android)


Every now and then, that little voicemail icon thinks it’s funny.
Voicemail Icon Vignette
WHY?!
Even when you don’t have a voicemail, it decides it wants to say hi and pester you in a non-dismissable notification at the top of your phone.
So, if you have checked your voicemail and there’s clearly none left but the icon won’t seem to get the hint, there is a way to remove the icon manually.
Essentially, what has happened is the phone’ never received the notification from the network that everything is read and it can clear that icon. So, what we can do is force the phone to recheck for that message by clearing its data/cache.
Here’s a quick way to remove the voicemail notification icon on your Android phone.
  1. Head to Settings by pulling down the notification shade and tapping the gear icon.Settings
  2. Tap on Apps.App Settings
  3. Tap on Phone.Phone Settings
  4. Tap on Data Usage.Data Usage
  5. Tap Clear Data, then tap Clear Cache.Phone Data & Cache
  6. Reboot the phone.
After that, you should no longer see the voicemail icon and be free of its tortuous presence.
Hope that helped some of you guys and feel free to let me know what you thought in the comments below or leave other ways to get rid of the voicemail icon for others who might need it there, as well.
Share:

5 Easy Ways To Spot A Fake Smartphone


A major problem that many top phone manufacturers are encountering is the cloning of their brands. This trend continues despite the painstaking efforts to make cloning difficult. Despite this, the counterfeiters are having a field day faking these brands and it has made it hard for users to differentiate between counterfeit and original phones. Jumia Travel, the leading online travel agency, shares tips for identifying a fake device.

1. Packaging
Manufacturers of counterfeit products are sometimes careless with packaging. Phone makers will always take care of the smallest details of design and packaging of their own goods. So, take a close look at the package, paying attention to the print quality ensuring consistency. In addition, ensure nothing should be loose inside.

2. Look at the wires and plugs
The quality of the wire is an important sign of a counterfeit product. If it is original, a plugged-in cable will sit firmly and evenly, while in a fake, you will see loose parts.

3. Check the user manual
The user manual is one of the easiest ways to identify a fake gadget. Every relevant information about the device must be there in the language of the country of purchase. If it’s written in some other language and you cannot read it, then it is a cloned brand.

4. Look at the fonts
All fonts and symbols on the gadgets must be similar, readable and regular. If this is not the case, it means the phone is fake or counterfeit.

5. Pay attention to the material
The material used for making a phone can either be high or low-quality. Popular brands don’t cut back on materials. The plastic covering the phone must be smooth, without any creases.

SOURCE:
http://naijapicks.com/posts/2578/5-easy-ways-to-spot-a-fake-smartphone
Share:

Phone Number Trick

1. Get a calculator. (You won't be able to do this one in your  head)

2. Key in the first three digits of your phone number (NOT the area code)

3. Multiply by 80

4. Add 1

5. Multiply by 250

6. Add the last 4 digits of your phone number

7. Add the last 4 digits of your phone number again.

8. Subtract 250

9. Divide number by 2

Do you recognize the answer?
Share:

10 Android Specifications To Look Out For Before Buying A New Phone (2017)


This is a very important aspect of phone pre- purchase tips. Let it be known to you that its very dangerous not checking out if a phone fits the bill before purchase, this mistake could go a long way to haunt you.
So here’s my advice for you, before buying a phone make sure you've checked for its specifications to ensure they actually comply with what am about to uncover below.

IMPORTANT ANDROID SPECIFICATIONS TO LOOK OUT FOR BEFORE BUYING A NEW PHONE

1. Screen Size/Resolution
This is the size of the device’s screen. It is most likely measured in inches or cm/mm.
Are you a fan of large screen phone, then you should be looking at a device in the range or larger than 5.5/6.0 Inches.
2. Android OS
Make sure it’s running on the most recent version of Android OS. As at the time of this writing, Android 6.0 (Marshmallow) should be your minimum target though Lollipop ain’t bad either, just make sure it has OTA update to receive latest Android updates.
3. Camera Pixels (Front & Rear)
We are all about the power of our cameras, taking high definition selfies. So make sure your front facing camera is up to the task, the rear should also be a monster.
You should be looking at a device in the range of-(Minimum: Front=5MP & Rear=8MP) If you so love snapping pictures at night then consider buying a phone with dual lead light, going for double lead rear camera light is perfect even though some single lead camera phone could appear brighter.
4. Battery Capacity
In a country like Nigeria with rapid decadence in electricity, it’s very paramount you don’t overlook this.
The capacity of your phone should be nothing less than 4000mAh unless you want to go about carrying a power bank. 3000mAh battery capacity is manageable though.
5. Network Type
This is optional but important if you’re looking to the future of Naija telecommunication providers.
Our mobile network providers can only provide max 3.75G internet speed. Having a device that can power 4G connection is way cooler and a plus considering the fact that it will in future cover for incoming 4G LTE network.
With Ntel about to roll out its 4G connection in selected states , don’t be left behind.
6. Processor Speed
This covers the response behaviour of your phone apps and services.
If you’re the type that enjoys playing high graphics games then you should endeavour to go for a minimum of 1.4GHz. (Hexacore or Octacore).
7. RAM ( READ ACCESS MEMORY)
Don’t hesitate to get a device with minimum of 2GB Ram.
With that, you can run more apps & services at once without experiencing a crash or your phone hanging unnecessarily.
8. Storage Capacity
Internal storage capacity of your phone should be at least 16GB and expandable with SD card. With this you can install more apps plus save more pictures, documents, videos and music.
9. Quick Charging Feature (Flash Charge)
Phones are recently built with ‘Quick Charge’, this features allows you to be able to charge your phone quicker and faster using a ‘Quick Charge’ charger.
In addition to the specs above, your desired Android phone will be much more complete with such feature. I’m really enjoying it here, writing from experience.
10. OTA Update
Why get a device without OTA updates? It can be very frustrating seeing you friend get firmware updates on his/her device and you not getting, don’t make the mistake.
Make sure you confirm that phone will constantly receive updates to firmware, services and functionality before making a purchase.
Share:

Popular Posts

Blog Archive

Powered by Blogger.

Categories

ASUU (1) Admission (14) Blogger Tips (6) Coding (4) Education (23) Facebook (2) Featured (1) Feedurner (1) How Tos (9) Inspirational (3) Instagram (1) Music (4) Phone Tips (6) Sports (5) Tech News (5) Web Hosting (2) Wordpress Tips (2)

Post Of The Day

How you can make money as a Blogger (HOT)

RevenueHits is a very popular AdSense alternative that works on a  CPA model  rather than CPM model. With the CPA format, you get a high co...

Labels

Blog Archive

Recent Posts

LIKE US ON FB

Translate